テーマ
どうも!!naoto555です。
今回は、日本語のダミーユーザーをSeeder,ModelFactory,Faker機能を利用して作成していく方法をご紹介していこうと思います。Seederとはデータベースにデータを一斉挿入するような機能になります。使用している開発環境構築,Jetstreamの導入についての詳細に関しては過去記事をご参照頂けるとうれしいです。(Laravel開発環境構築~ログイン機能の作成)
(2024.2記載)
開発環境
| 統合開発環境 | aws cloud9 |
| PHP | 8.1.16 |
| Laravel | 9.52 |
| login機能 | Laravel/jetstream(livewire) |
| Database | SQlite(version 3.7.17) |
解説
①ユーザーテーブルの編集
Jetstream導入直後のユーザーテーブルのカラムは以下で構成されています。
id(ID)、name(名前)、email(メールアドレス)、email_verified_at(メール認証)、password(ログインパスワード)、profile_photo(プロフィール画像)、timestamps(作成日時、編集日時)
database/migrations/2014_10_12_000000_create_users_table.php (jetstream導入直後)
public function up(): void
{
    Schema::create('users', function (Blueprint $table) {
        $table->id();
        $table->string('name');
        $table->string('email')->unique();
        $table->timestamp('email_verified_at')->nullable();
        $table->string('password');
        $table->rememberToken();
        $table->foreignId('current_team_id')->nullable();
        $table->string('profile_photo_path', 2048)->nullable();
        $table->timestamps();
    });
}
デフォルトのカラム以外のカラムにもSeederでダミーデータを入れてみたいので、handlename(ハンドルネーム)、profile(自己紹介)というカラムを追加してみます。
ターミナルで以下コマンドを打ち、作成されたマイグレーションファイルを編集します。
php artisan make:migration add_cloumns_to_usersdatabase/migrations/2023_XX_XX_XXXXXX_add_cloumns_to_users.php
//一部抜粋
public function up()
{
    Schema::table('users', function (Blueprint $table) {
        $table->string('handlename')->nullable();   //追加
        $table->text('profile')->nullable();        //追加
    });
}
マイグレーションを実行し、追加したカラムをデータベースに反映させます。
php artisan migrate②Factoryファイルの編集
UsersテーブルのFactoryファイルは、”/app/database/facrories/UserFactory.php”に初回から入っています。ですので、このファイルを編集していきます。
例えば、ProcutモデルのProductsテーブル用のFactoryテーブルを作成したい場合は、ターミナル上で以下のコマンドを打てばファクトリーファイルの生成ができます。
php artisan make:factory ProductFactory
database/factories/UserFactory.php
//一部抜粋
public function definition(): array
{
    return [
        'name' => $this->faker->name(),
        'email' => $this->faker->unique()->safeEmail(),
        'email_verified_at' => now(),
        'password' => '$2y$10$92IXUNpkjO0rOQ5byMi.Ye4oKoEa3Ro9llC/.og/at2.uheWG/igi', // password
        'two_factor_secret' => null,
        //'two_factor_recovery_codes' => null,        //削除
        'remember_token' => Str::random(10),
        //'profile_photo_path' => null,               //削除
        //'current_team_id' => null,                  //削除
        'handlename' => $this->faker->userName(),     //追加
        'profile' => $this->faker->realText(20),      //追加
    ];
}
③Seederファイルを作成し②で作成したFactoryファイルを登録していく
ターミナルで以下のLinuxコマンドを打ち、Seederファイルを作成
php artisan make:seeder UserSeeder
コマンドを打つと、”database/seeders/”の配下に”UserSeeder.php”が作成されるのでこのファイルを編集していく。count(10)の部分が何個ダミーデータを作るかを表しています。この場合、10件のダミーデータを作成します。
database/seeders/UserSeeder.php
use App\Models\User;    //追加

//---------------中略---------------
public function run()
{
    User::factory()->count(10)->create();   //追加
}
④configファイルを書き換え、生成されるfakerデータを日本語化する
”config/app.php”を編集して、生成されるfakerデータ(ダミーデータ)を日本語化します。
config/app.php
/*
|--------------------------------------------------------------------------
| Faker Locale
|--------------------------------------------------------------------------
|
| This locale will be used by the Faker PHP library when generating fake
| data for your database seeds. For example, this will be used to get
| localized telephone numbers, street address information and more.
|
*/

//'faker_locale' => 'en_US',   //削除
'faker_locale' => 'ja_JP',     //追加
⑤Seederの実行
ターミナルで以下のLinuxコマンドを打ち、作成したSeederを実行
php artisan db:seed --class=UserSeeder完成図
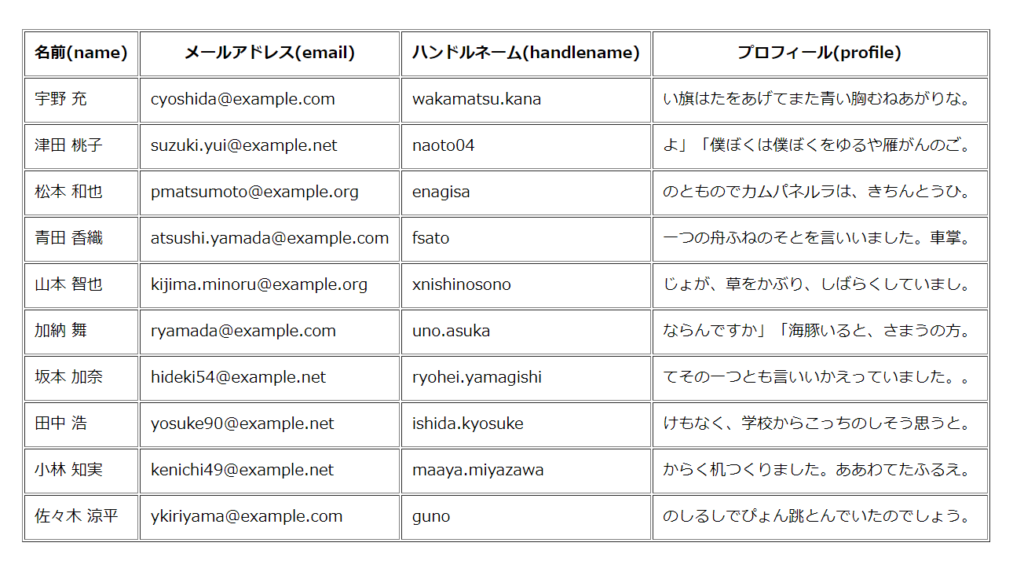
上記手順にて、下図のようにダミーのデータが作成されました。
プロフィールは、少しおかしな文章ですがSeeder,ModelFactory,Faker機能を利用するとこんな風に自動でダミーのユーザーデータをすることができます。

ちなみに上の表は、Userコントローラとビューを作成し↓の手順でビューに表示しています。
ターミナルで以下のLinuxコマンドを打ち、作成したSeederを実行
作成されたデータ一覧をビュー表示してみます。まずは、”Route/web.php”に以下の1文を追加します。
routes/web.php
use App\Http\Controllers\UserController;  //追加

//----------------------中略----------------------

Route::get('/users/index',[UserController::class,'index'])->name('users.index');
次にターミナルに以下のコマンドを打ち、コントローラを作成。
php artisan make:controller UserController --model=Userコマンドを打つと、”UserController.php”が”app/Http/Controllers”の配下に作成されるので、これを編集。
app/Http/Controllers/UserController.php
//index()を以下のように編集
public function index()
{
    $users = User::all(); //追加
    return view('users.index', compact('users')); //追加
}
次にターミナルに以下のコマンドを打ち、ビューを作成。
# usersフォルダの作成
mkdir resources/views/users

# indexビューファイルを作成
touch resources/views/users/index.blade.php
作成したIndexビューを編集
resources/views/users/index.blade.php
<div style="margin:30px">
    <table border="1">
        <tr>
            <th style="padding:10px;">名前(name)</th>
            <th style="padding:10px;">メールアドレス(email)</th>
            <th style="padding:10px;">ハンドルネーム(handlename)</th>
            <th style="padding:10px;">プロフィール(profile)</th>
        </tr>

        @foreach($users as $user)
        <tr style="padding:10px;">
            <td style="padding:10px;">{{ $user->name }}</td>
            <td style="padding:10px;">{{ $user->email }}</td>
            <td style="padding:10px;">{{ $user->handlename }}</td>
            <td style="padding:10px;">{{ $user->profile }}</td>
        </tr>
        @endforeach
    </table>
</div>
下のコマンドをターミナルで打ち、Prevew→Preview Running Applicationをクリックし、表示されたURLの末尾に”/users/index”と打てばindexビューが表示されます。
php artisan serve --port=8080まとめ&補足
今回は、Fakerを使ってダ日本語のミーデータを作成してみました。
Laravelには最初からこのダミーのデータを作るFakerが搭載されています。なので、ライブラリ等からインストールしなくてもそのまま使用することができます。よく使われるコマンドと解説の②に以下の記述を書いたときの出力結果を以下の表にまとめました。
| 項目 | 記述 | 出力結果の例 | 備考 |
| 名前 | $this->faker->name() | 鈴木 幹 | |
| メールアドレス (実在しない) |
$this->faker->safeEmail() | cyoshida@example.com | |
| メールアドレス (フリーメール) |
$this->faker->freeEmail() | jun53@mail.goo.ne.jp | 実在するかもしれないアドレスが生成されるので注意 |
| ファーストネーム | $this->faker->firstName() | 千代 | |
| 苗字 | $this->faker->lastName() | 斉藤 | |
| ユーザー名 | $this->faker->userName() | fkanou | |
| 電話番号 | $this->faker->phoneNumber() | 08459-1-0068 | |
| 住所 | $this->faker->address() | 5851602 栃木県吉田市東区佐々木町山岸1-4-9 | |
| 国 | $this->faker->country() | フィジー共和国 | |
| 県名 | $this->faker->prefecture() | 秋田県 | |
| 会社名 | $this->faker->company() | 有限会社 中村 | |
| パスワード | $this->faker->password() | H\kJw.e}Io | |
| 日付 | $this->faker->dateTime()->format(‘Y-m-d’) | 1977-05-11 | |
| クレカの番号 | $this->faker->creditCardNumber() | 4532032521905382 | |
| 性別 | $this->faker->randomElement($array=[‘男性’,’女性’]) | 男性 | |
| 誕生日 | $this->faker->dateTimeBetween(‘-70 years’, ‘-15years’)->format(‘Y-m-d’) | 1999-08-28 | 15歳から70歳 |
| 文章 | $this->faker->realText(20) | みように露つゆが太陽たいどこまでも着つ。 | 200文字以下まで生成可能 |